Mainichi Hanafuda: my drawing process
 Some of you might be interested to learn about how I make these cards? If you were wondering about the process, then read on, for all will be explained. If you just want to see the finished cards, you can scroll down to the bottom of the post. Everybody wins!
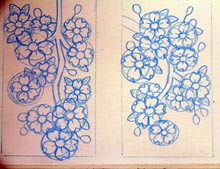
I start by drawing a sketch with a special "non-photo blue" colored pencil. These are great for sketching, because they use a particular shade of blue that's not detected by optical scanners. This way, when I scan it into the computer, the pencil lines don't show up--only my inks do.
My process at this point is fairly organic. I start out with a general idea for layout, but I might revise it as I go along. I draw the border rectangles by tracing a business card. Once I have a satisfying sketch outline, I ink the image. I have done my first ink on the card on the left. On the right card, I've gone over my lines a second time to make them bold and correct any minor mistakes.
As I lay down ink, I often deviate from the sketch to add or modify elements of the design. Sometimes I sketch something but decide to leave it out of the inks, which you should be able to see in a few places where I omitted cherry buds.
I'm careful about inks and it's the most time-consuming part of the entire process, but sometimes I mess up, and I can fix that in Photoshop. The next step is to scan the image and lay it out on my card sheets. Here are both cards in their boxes. I draw each image at a larger size than the final card, so they overlap with the edges when I first drop them in. You can see them here before cropping.
Forcing myself to cut off one or more sides of the picture adds an element of discovery that I enjoy. But, sometimes I draw the whole thing too big and have to shrink it. Or sometimes I have to move stuff around a little bit to make it look right in the final design. That's when I'm really glad we have computers that can do all of those things. Jenna is not so happy about it, because I am learning how nice it is to use Photoshop on her G5. I'm starting to use all the shortcut keys now, and it's awesome. We have to arm-wrestle for control of the stupid little round mouse (I still hate the Mac mouse). Coloring is the final step. I use the border red in at least one card for every suit. If it's appropriate, I also try to apply colors that I have already used in previous suits. Apart from that, I use whatever color strikes my fancy. On these cards, I picked a yellow from before and a brand-new pink for the blossoms.
My Photoshop files are broken up into sheets of 10 cards. After I finish a card, I cut it out and upload it to Flickr to share with all of you. And that's the whole process! When I have completed the entire deck, I'll print it out on business cards.
I hope you enjoyed this "insider look" at the birth of a hanafuda card. If you've got any questions, ask away, and I'll answer 'em. Otherwise, check back in tomorrow to see the next card in the maple suit--drawn in the style that was voted most popular by you, my readers!
![]()

1 comment:
Rofffles!!
Post a Comment